Abstract:
Being an extremely reactive alkali metal, anybody would suggest lithium would be a hard find for the grubby mitts of the home chemist. Thankfully, a few brands of battery allow the best and easiest method of extracting large chunks of the metal, without any more hassle than a little time and some old-fashioned elbow grease. Depending on your tools and methods for attempting to crack open a steel casing though, the job can range from much harder to slightly easier.
Introduction:
Lithium, as well as alkali metals in general, are pretty cool. Metals are usually associated with strength and longevity, holding bridges and buildings tall and lasting years upon years. These peculiar metals are the rebels of the bunch; just touching water can cause them to explosively react, the high temperatures igniting the hydrogen given off to produce a flame.
They also sport very low melting points around the boiling point of water. Any bridges made of these alkali metals would not win any awards if they existed, any rain would signal the melting and exploding doom of the structure.
Out of the crew though, lithium beats the rest in a flame, producing a fantastically bright white light when burning in air, with the resulting product producing a red flame, characteristic of the lithium ion.
Being such a reactive metal and being relatively expensive, it is a nice surprise to find the pure metal so easily available to the amateur in the form of lithium batteries. Lithium-ion batteries will not work for this however, as the lithium inside is in ion form and producing lithium metal from lithium ions is very difficult – just buying batteries, such as Energizer Ultimate Lithium batteries, that have the metal in its elemental, metal state is much easier.
These types of batteries love shorting-out however so developing a strategy that consistently works to open them is key. You cannot though drain the batteries to prevent any shorting-out as this chemically uses all of the lithium inside – therefore brand new batteries are also the best.
Safety:
| Substance | Hazard information |
| Lithium | Corrosive/Highly flammable
It reacts violently with many substances. It reacts rapidly with water to produce hydrogen, an extremely flammable gas. Although difficult to ignite, once lit, it burns readily in air and is difficult to extinguish. It causes burns. Contact with moisture produces lithium hydroxide which is an irritant to the skin and eyes. |
- Gloves and goggles should always be worn when handling chemicals to protect your sensitive eyes and skin.
- Chemical gloves are always useful, but I recommend thick, tough working gloves to protect your skin from the jagged metal created when hacking open the battery.
- I recommend wearing a lab coat to protect your clothing and skin from any internal fluids of the battery. Be aware that this type of battery is extremely prone to shorting out, easily heating up very hot and potentially exploding if any pressure build up can not be vented. If the battery becomes hot, place it on a hard surface such as a brick and back up a few metres, leaving it to cool down before attempting again to open the battery.
- Metal tools when opening the battery casing can easily short-out the battery if they connect the positive end to the negative end (anode to the cathode).
- Work should be carried out in a well ventilated area such as outside or in a fume hood to reduce the chance of inhaling any fumes given off if the battery is shorted-out. Also any open flames or containers of water should be removed from the area due to lithium reacting with air when heated and also reacting violently with even cold water.
- If the lithium is to be stored, an airtight and watertight container is recommended. Also the lithium must be stored in an appropriate liquid to prevent decomposition in air – kerosene or paraffin oil is suggested, I use cheap baby oil which is purified parraffin oil. You obviously can not use water as this will violently react with the lithium. I also recommend a marble to act as a small weight on top of the lithium to prevent the lithium from floating to the top of the storage liquid and reacting with the small volume of air in the container. I write more on storage nearer the end of this post.
- If you hate the smell of rotten eggs then you are in big trouble! (You can use a breathing mask to reduce it if you really do hate the smell!)
Experimental:
I tried two ways of opening the batteries, the second method was easier but required extra tools; I will show the original method I tried first. Just for reference, these are AA batteries.
![IMG_7141[1]](https://18thtimelucky.files.wordpress.com/2018/01/img_71411-e1516552438233.jpg?w=736)
![IMG_7142[1]](https://18thtimelucky.files.wordpress.com/2018/01/img_71421-e1516552582148.jpg?w=736)
![IMG_7145[1]](https://18thtimelucky.files.wordpress.com/2018/01/img_71451-e1516397670129.jpg?w=736)
While attempting this step, it is almost unavoidable to not short-out the battery. The metal tools provide a great medium for the stored electricity to jump through when accidentally connecting the negative shell (cathode) with any part of the positive valve (anode). Several times a beautiful, unfortunately unwanted, orange spark would appear and, almost as quickly, disappear due to a slip with the metal pliers.
![IMG_7146[1]](https://18thtimelucky.files.wordpress.com/2018/01/img_71461-e1516397696409.jpg?w=736)
![IMG_7147[1]](https://18thtimelucky.files.wordpress.com/2018/01/img_71471-e1516397770719.jpg?w=736)
![IMG_7148[1]](https://18thtimelucky.files.wordpress.com/2018/01/img_71481-e1516397807546.jpg?w=736)
If memory serves, one is a black tape of crumbly iron disulfide, one is a plastic membrane, and the last is our final beautiful foil of lithium metal. Do you smell the sweet smell of victory and perseverance?! No, actually, you do not – that is the stench of rotten eggs coming from the iron disulfide you threw everywhere in your dance of happiness. Good luck cleaning that up! It is not worth keeping and can be thrown out as general rubbish along with the rest of the battery pieces.
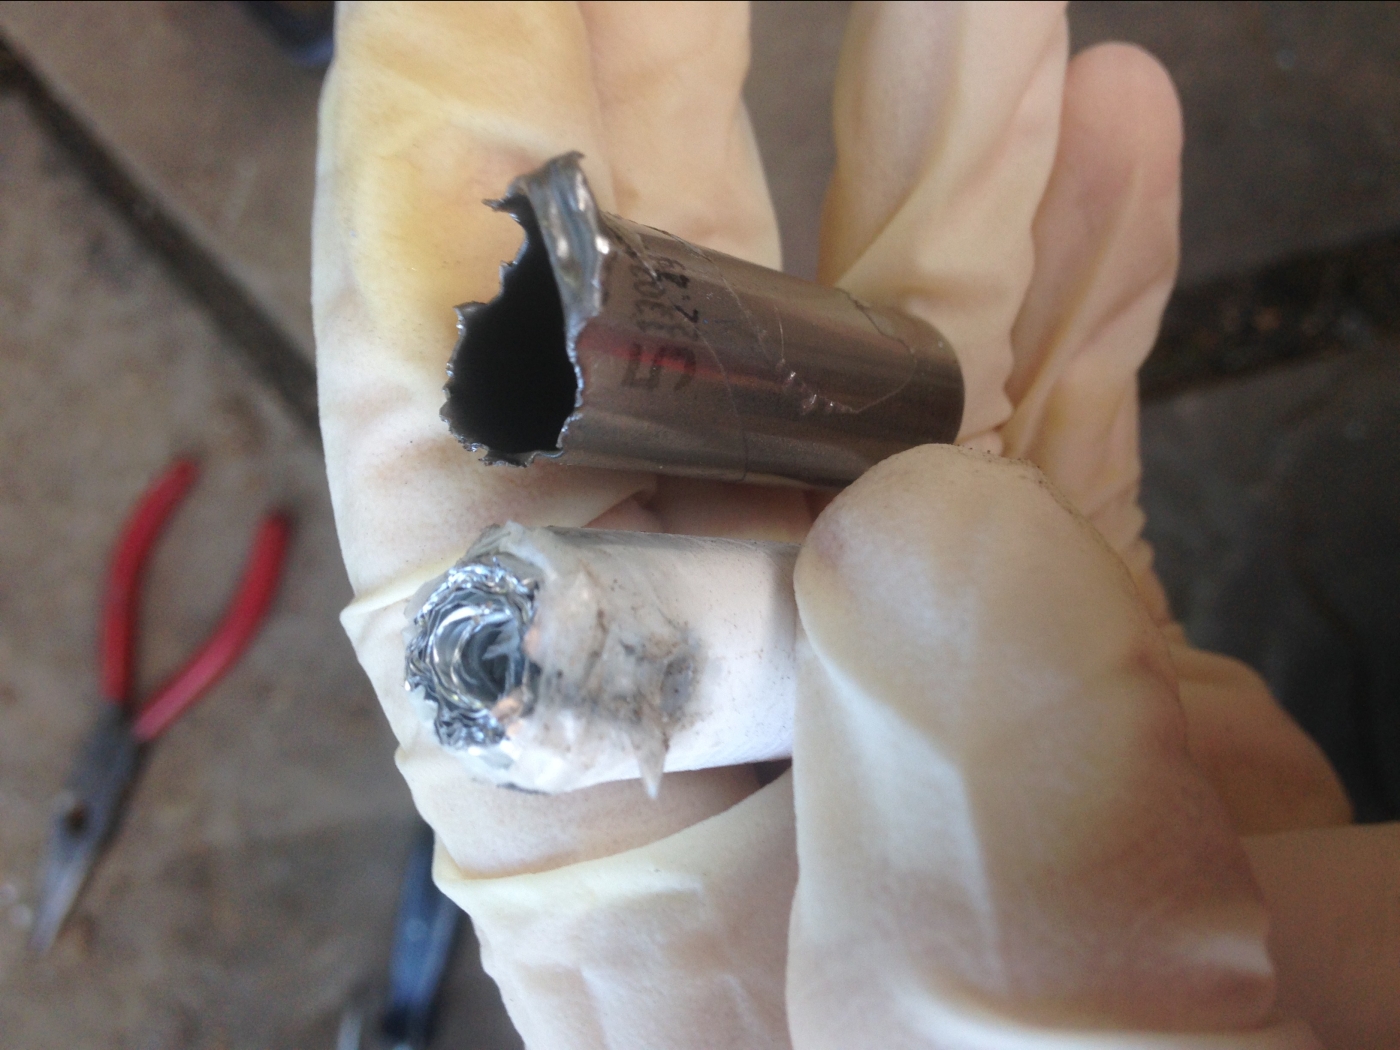
The easier way I found to get into the batteries was by using a metal pipe cutter to slice through the steel of the battery. I tried this by cutting the steel casing in two, although this immediately shorted-out as it cut into the lithium roll as well. A second attempt showed no difference and both batteries got so hot they had to be left to cool for several minutes. I found cutting at the neck of the battery though yielded the best results.
Results:
Once the lithium has been extracted, the long piece of foil should be quickly folded up and plopped into a container of unreactive oil such as kerosene or paraffin, as mentioned in the safety section. Lithium will float on almost any liquid so I recommend a marble or two to hold down all of the lithium so it does not oxidise in the air in the container. If you take too long fiddling with the lithium foil it will quickly tarnish in the air and turn black before your eyes; be quick with getting it into storage!
I was not able to weigh the lithium before using most of it up, but when I need more lithium and extract more I will add the yield of lithium here. I will say though there is quite a hefty amount of lithium in each battery, enough for any needs you might have after opening a pack of four. I definitely recommend extracting some lithium this way and using it for a few fun experiments. I will leave you with a photo of some of the lithium I extracted that I have left.
![IMG_7917[1]](https://18thtimelucky.files.wordpress.com/2018/01/img_79171.jpg?w=736)
Further reading or watching:
YouTube channel NileRed – Getting Lithium from a Battery
YouTube channel NurdRage – Get Lithium Metal From an Energizer Battery

great post!
LikeLike
Thank you very much!
LikeLike
I’m impressed, I have to say. Really hardly ever do I encounter a weblog that’s each educative and entertaining, and let me let you know, you may have hit the nail on the head. Your idea is excellent; the problem is one thing that not sufficient people are talking intelligently about. I’m very completely happy that I stumbled across this in my search for something relating to this.
LikeLiked by 1 person
Hello Terisa, your comment could not have been more perfectly timed! I had a huge dip yesterday and today after working very hard but not quite securing a place to talk at TEDxWarwick.
I write these posts because I’m as enthusiastic as one can be with chemistry and other scientific hobbies, but what is the worst demotivator is feeling useless and your hard work unappreciated. The odd comments I get like this is what keeps me going though, it’s why my posts are often weeks or months apart – if I don’t have the motivation or inspiration, I just can’t write.
Thank you for taking your time to make my day, I’m glad I could be of service to you. Have a great Christmas!
LikeLike
I agree !Me being a beginner and totally new to this kind of thing, Was very educational,looked and looked on the net to even find the physical appearence of lithium coming from a battery,and thank god that I found your genius post, was quite a bit more of a process than I thought and quite a few key things a person sure hopes they know before they attempt this type of experiment. Thanks very much,you nailed it by far!
LikeLiked by 1 person